We are located in the Buffalo Shopping Center in Buffalo, Tx. Open Tuesday-Saturday 10-5 (903)322-1973 Call or stop by today!

Tuesday, June 21, 2011

Technique Tuesday {6/21/2011}

Whoo! I tell ya it has taken longer to upload the video from the camcorder, edit that video down to 15 mins; than it took to complete this weeks Technique Tuesday and that included the nearly 200 pictures used to show you this fantastic technique! In this video, I used one kit from the Simple Stories collection (Destination) and two variety packs (of 10 ct ea) of photo sleeves (page protectors)by We R Memory Keepers.

Here it is summer 2011 and I have not scrapped last year's vacation yet. I did get a digital book done and printed X5 last year as I usually do for the kids but not all the pictures were included so I wanted to do a traditional book for the family. But vacation pictures? There were nearly 500 taken.

Watch this video and see how I scrapped nearly 200 of those pictures in one afternoon!


Then below is a digital 12x12 I created for the cover page because the WRMK packs each came with a full page protector in its variety pack.


Here is a traditional page on the back side using the scraps left over in the kit ...


Another set going in the back, partly because I used those few pictures I had done nothing with yet so I created a pocket to hold a bundle for that last page incase anyone really wanted to see SOME MORE SCENERY :) .


So there ya go! Get into the store and gets your kit and variety packs 20% off through June 27th!! Get those bazzillion pictures you have scrapped quickly. Choose from three kits and about 10 different pocket packets, you choose the combination.

Tuesday, June 14, 2011

Technique Tuesday

I found an amazing video tutorial surfing around on YouTube the other day and I wanted to share it with you!
It's making gorgeous roses out of Crepe Paper streamers and Tattered Angels Mist!
Check it out by clicking on the link below:

Crepe Paper Roses

We have a huge selection of gorgeous Tattered Angels Mists, as well as Alcohol Inks in the store! Stop by and see what pretty combinations of colors you can come up with to create these roses!

Wednesday, June 8, 2011

Technique Tuesday {6/7/2011}

BriAnna and I went to the Great American Scrapbook Convention in Arlington this last Saturday! We didn't arrive until 1:30 p.m., so we went through all 6 aisles plus the permiter booths in just 3 hrs. 15 mins. It couldn't have been possible except my youngest was with us playing the part of bag carrier. Big hugs to him!

I was impressed with three different new things I found at GASC, I will share one with you. Kiwi Lane; I bought an assortment of templates to mix and match on my pages; allowing me to layer and add dimension through curved lines. Using the templates organized on my layout and get a great idea what the l/o will look like before any paper is cut.

Here are the templates I bought:


Here is one layout I created using the templates


And a two page layout:


This layout I didn't use the templates but they inspired me to chop up a die cut sheet to use as corner mats to the pictures.


Here is the video posted on their website showing how to use the templates. I was going to start carrying them in the store until I saw you can buy them yourself right from their website. I really feel these templates were a genius idea, creating another style of scrapbooking. Simple, yet playful!


Kiwi Lane

Tuesday, May 24, 2011

Technique Tuesday {05.24.11}

The gift of MEMORIES is one of the greatest gifts we can give to the ones we love. While scrapbooking an entire album for someone may not always be possible, we can share our beautiful memories through an altered wooden canvas!

In the store, we offer Kaiser Beyond The Page: Wooden Canvases in the following sizes: 4x4, 6x6, 8x8 and 12x12.


Using basic scrapbooking supplies, you can create a beautiful art that anyone would treasure for years to come!
To create an altered wooden canvas, you simply build a scrapbook page straight onto the wood. I begin by adhering my background page onto my wooden canvas using a foam brush and ModPodge.


Simply apply a smooth, semi-thick coat of ModPodge, lay down your background paper and smooth out all the wrinkles. Be especially careful to make sure the edges are glued down. Don't worry if your paper is too big for your board- once dry completely, simply take a sander like the Tim Holtz Sanding Grip and sand any overlapping paper off of the wood.


Now the fun begins! Get creative and build your page! Add paper and photos and embellishments to get your desired look! Once your page is complete, it's a good idea to seal you creation using a thin coat of ModPodge or even a spray sealer so that everything is secured well and will last forever.


Here are some of the wooden canvases that I have made and given to special people in my life:


These canvas projects are so much fun to create! I hope this inspires you to try out altering wooden canvases for yourself! It's easy as pie and tons of fun!


This week, take advantage of 20% off all wooden canvases in the store!

Wednesday, May 18, 2011

Let's Talk COLOR & PATTERNS!!

What I love most about Spring and Summer are the bright fun colors and patterns that you see everywhere! As scrappers, we can find inspiration to use colors and patterns in all sorts of places! From fashion magazines to home decor, everywhere you look right now people are mixing bold colors and patterns to create eye-popping results! We can do the same thing with our pages! Who says everything has to match perfectly? Who says you can't mix zebra print with polka-dots? There are no rules in this craft, it's all about having fun and being creative as you preserve your family's memories!


Take a look at these bedding designs from Pottery Barn:


I love how they mixed random colors and patterns to create a fun and whimsical look!
In the first one, they used bright colored flowers, but then added the black and white polka-dot trim to anchor the design, but yet also give a fun "pop" against the crazy colors!
In the second set, I love how every color and pattern are totally random, but yet together create a cohesive look. From the florals, to stripes, to dots- it all works together!


Now let's look at some fashion inspiration! These photos are from Heart & Home right here in Buffalo!


In the first dress, not only are they mixing various patterns and neutral colors, but they added the fushia stripes which grab your attention and add fun flair!
In the adorable baby outfit, they took 2 patterns that most people would not think to mix together- floral & animal print, but as you can see, it totally works! It creates a fun, yet feminine touch that is full of "sass"!
I hope these photos have inspired you to take risks in your scrapping when it comes to color and patterns! Don't be afraid to mix and match and try something new!
In the store right now, we have the perfect line for you to practice with! Our Canvas Corp collection is amazing and FULL of fun colors and patterns! From zebra print to polka-dots to random words, these papers take "mix & match" to a whole new level!


Check out this cute page by Cheryl Lane:


Using the Canvas Corp Red & Kraft Zebra Print and "Live Laugh Love" papers, along with a bright floral print by Fancy Pants, she created a fun page full of bright colors and interesting patterns, but keeps the photo as the main focus.


Stop by the store this week and check out all of our new Canvas Corp papers!! And to top it off- they are 20% off this week!


Tuesday, May 10, 2011

Technique Tuesday {05.10.11}

For today's Technique Tuesday, I wanted to share with you a really fun product we carry in the store- BURLAP!

There are so many fun products that you can use on your scrapbook pages and products that you would not normally think to use and BURLAP is one of my favorites!

Burlap is a very versatile material. You can use it in strips across your page like this:


The page above is a "country" type page, so naturally, burlap works perfectly!
But don't think you have to be bound to only using burlap on rustic-type pages, it's also a beautiful addition to an elegant page:


I mixed elegant paper & embellishments with the burlap to give my page a "natural" look!
I added burlap behind my title:


I also added tiny squares of burlap behind circle butterfly stickers:


For my burlap flower, I simply cut the burlap into strips forming loops and "tails" and then placed my silk and crochet flower on top:
There are tons of fun ways that you can use burlap on your pages!
Cut it into circles of various sizes, stack and add a button in the middle to make a lollipop flower!
Cut small circles and use as flower centers!
Cut a 12x12 piece and use as the background on your page!
Burlap also makes great "sand" for Beach pages!
Get creative and see what ways you can come up with!
At Photolicious, we sell burlap in 18"x24" rolls:
They retail for $2.49, but this week they are on sale for only:

$1.99

So stop by this week a grab a roll and let the fun begin!!!


Tuesday, May 3, 2011

Technique Tuesday {05.03.11}

Today's Technique Tuesday is super cute and easy! Let's make


PLEATED ROSETTE FLOWERS!


Today's tutorial comes from April's Scrapbooks, Etc magazine:


(click on the instructions to view them larger)


Here is a page I made featuring my pleated rosettes:


Hope you've enjoyed today's tutorial!


Stop by the store this week and take advantage of our Technique Tuesday sale:
Bazzill Cardstock $.50 and Mini-Misters $1.50


Tuesday, April 26, 2011

Technique Tuesday {04.26.11}

This week's Technique Tuesday features a super cool new product by Bazzill Basics called: Perfectly Pleated

These are adorable 12 inch strips that are pleated and stitched. The colors we offer in the store are: red, pink, brown, black, white & green. They come in packages of 4 for $4.50


These little strips can add so much fun to your pages, cards & projects!


In the page below, I simply adhered my Perfectly Pleated strip at an angle across my page. I choose to cover up the stitching with yellow ric-rac, but they look really nice with the stitching showing, as well.


The Perfectly Pleated strips can be inked, painted, misted or stamped! Can't find the exact color you need? Buy white and make them the color you need! The possibilities are endless!

Stop by the store this week and pick up a pack of PERFECTLY PLEATED for 20% off!


Tuesday, April 19, 2011

Technique Tuesday {04.19.11}


For today's TECHNIQUE TUESDAY, we are going to play with METAL! In the store, we carry TEN SECONDS STUDIO products. From metal sheets and tools to embossing molds of all sizes- we have everything you need to create amazing projects and pages with Metal!

There are soooo many cool things you can do with METAL to enhance your paper crafting projects. For a TON of tutorial videos, check out the video page on the TEN SECONDS site HERE
I wanted to share a really quick tutorial to give you an idea of how you can use metal on your pages or cards.

To create a pretty square that makes a fun embellishment, I took a square mold and a sheet of metal. Using a TSS paper stump, I simply embossed the pattern by hand.


Once my design was embossed, I used a TSS Burnishing Block to sand the metal so the design would come through.


This is what my square looks like once it's cut out and ready to be used:


On this page below, I used a border mold to create a strip to use down the side using the same techniques as above.


Here's a close up:
It's an easy and fun way to add a cool touch to your projects!

So stop by the store this week and take advantage of 45% off all Ten Seconds Studio products.

Friday, April 8, 2011

Technique Tuesday {04.12.11}

This week's "Technique Tuesday" spotlights one of the fun new collections from BoBunny:Don't let the "Double Dot" name fool you- there are so much more than DOTS to this collection!!


What I love so much about this line is the versatility! We offer 18 colors of each design in the store. Plenty of choices to match the colors you are using in your projects! The possibilities are endless with this collection!


The technique I want to show you this week using the Double Dot is:


Adding Texture To Your Backgrounds


You can see in this simple layout below, that there are circles "popping" off of my page! It's not "dramatic" texture, but adds a simple flair to the overall look of the page.


To create this look, I simply took 2 of the sheet I chose for my background and punched circles from one of them. I adhered the circles randomly on my page with foam squares so they would "pop", then built my page around them!


This is such an easy technique that is perfect with the Double Dot Designs collection. Why use a solid piece of cardstock for your background when you can amp up your pages with these cool designs! Stop by the store this week and take 25% off all 4 Designs of Double Dot for our Technique Tuesday Sale!! Over 50 colors & designs to choose from!!

Tuesday, April 5, 2011

Technique Tuesday {04.05.11}

For today's Technique Tuesday Tutorial, we're going to make flowers out of dryer sheets! Yep- you read that right-

Dryer Sheets!

These can be made from new or used sheets, so if you don't want to waste one- then grab it right out of your dryer and it'll work just fine!

I've been seeing lots of tutorials on making these and decided I wanted to try for myself with supplies we have right here in the store! They are so easy and turned out so pretty! And you can tint them whatever colors will work best for the papers you want to use! Here are the supplies you'll need:

- Dryer Sheets {new or used}

- Glimmer Mist OR Alcohol Ink

- Stickles OR Glimmer Glam

- Scissors

- Glue Dots OR Hot Glue

- Brads, Stones, Buttons, Etc {for your centers}

Let's get started!! - Layer your dryer sheets and cut out circles in varying sizes from large to small. I made 5 circles, each just a little smaller than the other. You don't have to be very exact with cutting your circles, just take a pair of scissors and cut. The circles do not have to be perfect, in fact I like them better with a "random" look!


Now for the fun part!! Spritz your circles with some Glimmer Mist- We sell Tattered Angels here in the store OR make your own using one of our many colors of Adirondack Alcohol Inks! Simply fill your Mini Mister with water, a few drops of alcohol ink and if you want some glitz- a pinch of Perfect Pearls (or mica powder). Allow them to dry.


Once the sheets have dried completely, it's time to add some glitz & glam! For the lighter circles, where I used the Alcohol Ink, I painted on Glimmer Glam "Tinsel Town" for a splash of bling! On the darker circles, where I used the Tattered Angels Glimmer Mist, I chose to give them some sparkle by adding Diamond Stickles around the edges.


Let your bling dry completely, and then you can build your flowers! Using Glue Dots or Hot Glue, stack the circles to make lollipop flowers. Add centers and there you have it! Dryer Sheet Flowers! Here's a close-up of my final result:


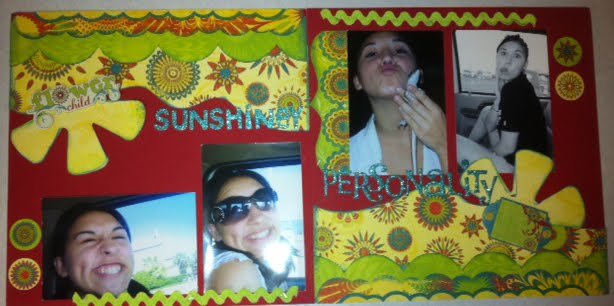
I placed my flowers on a page using the gorgeous "Spring Market" line by Webster's Pages that we have in the store!


So stop by the store this week and take advantage of our Technique Tuesday Sale! Receive 25 % off all Tattered Angels Glimmer Mist, Glimmer Glam, Adirondack Alcohol Ink & Stickles!